

Scaffold#
Create a solution#
Create a solution in the current working directory using SAF CLI.
Instantiate the solution template:
saf newWhen prompted, provide the following values, pressing Enter to select the default value or to validate non-default values provided.
Enter a solution name.
You can use the default option (
my_solution) or provide a custom one. If you provide a name, make sure it follows the rules described in Solution naming conventions.What is the solution name? [my_solution]:
The
solution nameis used as the name of the root directory of the Python project.Enter a solution display name.
You can use the default option (
My Solution) or provide a custom one.What is the solution display name? [My Solution]:
Specify the UI framework.
You can use the default option (
dash) or selectnone.What is the UI framework of the Solution? - dash - none Choose UI framework [dash]:
Enter the solution namespace.
You can use the default option (
saf.solutions) or provide a custom one.What is the solution namespace? (e.g. myorg.apps) [saf.solutions]:
A directory with the provided solution name is created in the current directory with at least the contents shown in Project structure.
Tip
A one-line command to create a solution is also available. Use the --solution-name, --solution-display-name, --ui-framework, and --namespace options to specify the solution name, display name, UI framework, and namespace, respectively.
Setting these options disables their command prompt. For example:
saf new --solution-name minimal-solution --solution-display-name "My Minimal Solution" --ui-framework dash --namespace saf.solutions
Create a solution in a specified working directory using Solutions Manager.
Open Visual Studio Code.
In the Activity Bar, click the Solutions Manager icon.
In the Solutions Manager pane, expand the Create Solution view.
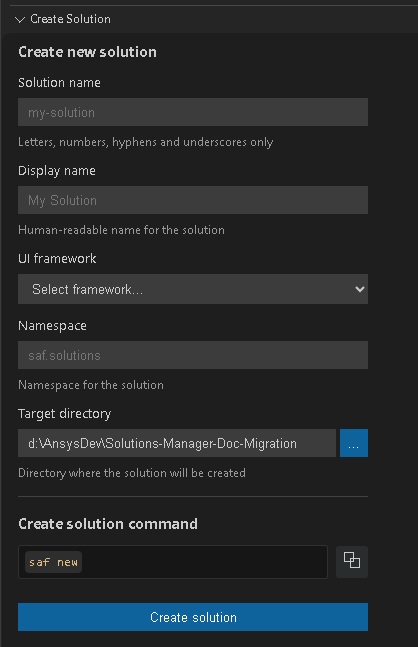
Provide the following values:
Enter a solution name.
You can use the default name (
my_solution) or provide a custom one. If you provide a name, make sure it follows the rules described in Solution naming conventions.Enter a solution display name.
This value is automatically generated based on the solution name (
My Solution). You can modify it as needed.Select the UI framework.
Select a framework to use for the solution.
Enter the solution namespace.
Enter the namespace to use for the solution.
Enter the target directory.
Enter the directory where the solution will be saved.
Generate the solution.
Click the Create solution button. Alternatively, you can copy the command under Create solution command and run it in the terminal.
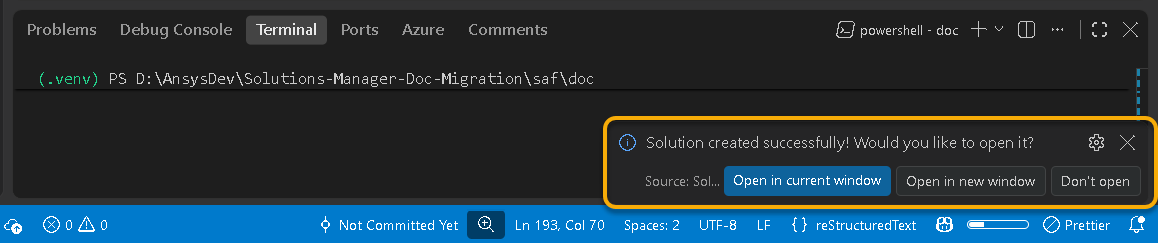
A directory with the solution name is created in the target directory with at least the contents shown in Project structure. A dialog in the bottom right corner of the VS Code window indicates that the solution was created successfully.
In the dialog, click a button to indicate if and where you want to open the solution.
Solution naming conventions#
Make sure your solution name follows these conventions:
A solution name cannot be a path.
A solution name cannot contain:
Forward-slash (
/) or backward-slash (\) charactersInvalid characters: colons (
:), semi-colons (;), asterisks (*), question marks (?), or angle quotations (<,>)
Solution scaffolding#
The solution template creates a ready-to-develop solution that includes:
Basic project structure following Ansys solution standards
Python package structure with solution namespace
Configuration files for development
Setup scripts for environment configuration
UI components (if selected)
Project structure#
The following diagram illustrates the structure of a scaffolded solution:
minimal-solution/
│
├── .devcontainer/              # Dev container configuration for GitHub Codespaces or VS Code remote containers
│   └── devcontainer.json       # Container settings, extensions, and port forwarding
│
├── .github/                    # GitHub-specific configuration
│   ├── labeler.yml             # Automatic PR labeling rules
│   ├── labels.yml              # Repository label definitions
│   └── workflows/              # CI/CD pipeline definitions
│       ├── build-release.yml   # Build installer and publish releases
│       └── label.yml           # Label automation workflow
│
├── .vscode/                    # VS Code workspace settings
│   ├── extensions.json         # Recommended extensions for contributors
│   └── launch.json             # Debug configurations for backend and frontend
│
├── deployments/                # Deployment configurations for on-premise and containerized environments
│   ├── Dockerfile              # Container image definition for the solution
│   ├── distributed-deployment-template/
│   │   └── compose.yaml        # Docker Compose for distributed (multi-container) deployment
│   ├── standalone/
│   │   └── compose.yaml        # Docker Compose for standalone deployment
│   ├── standalone-with-hps/
│   │   └── compose.yaml        # Docker Compose with HPS job submission support
│   └── standalone-with-minerva/
│       └── compose.yaml        # Docker Compose with Minerva data management integration
│
├── doc/                        # Sphinx documentation for the solution
│   ├── .vale.ini               # Vale linter configuration for documentation style
│   ├── make.bat                # Windows documentation build script
│   ├── Makefile                # Linux/macOS documentation build script
│   ├── source/
│   │   ├── conf.py             # Sphinx configuration (theme, extensions, metadata)
│   │   ├── index.rst           # Documentation landing page
│   │   ├── _static/            # Static assets (CSS, images) for the documentation
│   │   └── getting_started/    # Getting started guides for end users
│   └── styles/                 # Vale vocabulary and style rules
│
├── examples/                   # Usage examples and demo scripts
│
├── lock_files/                 # Pre-generated Poetry lock files per UI framework variant
│
├── minerva/                    # Minerva integration configuration (CLI auth, OAuth certificates)
│
├── src/                        # Source code root
│   └── ansys/
│       └── solutions/
│           └── minimal_solution/
│               ├── __init__.py         # Package marker
│               ├── main.py             # Entry point — calls glow_main() with definition and app
│               │
│               ├── portal_assets/      # Assets displayed in the Ansys App Portal
│               │   └── description.json  # Solution metadata (name, description, icon)
│               │
│               ├── solution/           # Backend: workflow definition, steps, and business logic
│               │   ├── definition.py   # Solution class — defines steps, display name, and version
│               │   ├── first_step.py   # First step model — state fields and @transaction methods
│               │   ├── second_step.py  # Second step model — state fields and @transaction methods
│               │   ├── method_assets/  # Static files used by transaction methods (input data, configs)
│               │   └── scripts/        # Python scripts invoked by transaction methods
│               │       └── assets/     # Assets used by scripts (templates, reference data)
│               │
│               └── ui/                 # Frontend: Dash application and pages
│                   ├── app.py          # DashProxy application instance with transforms and routing
│                   ├── assets/         # Static frontend assets served by Dash
│                   │   ├── css/        # Stylesheets (Bootstrap, custom styles)
│                   │   ├── icons/      # Application icons (dark/light variants)
│                   │   ├── images/     # Images used in the UI
│                   │   ├── logos/      # Solution logos (dark/light variants)
│                   │   └── scripts/    # Client-side JavaScript
│                   ├── components/     # Reusable Dash UI components
│                   └── pages/          # Dash pages (one per step + about page)
│                       ├── about_page.py   # About/info page
│                       ├── first_page.py   # UI for the first step
│                       ├── page.py         # Base page utilities
│                       └── second_page.py  # UI for the second step
│
├── tests/                      # Test suite (pytest)
│   ├── conftest.py             # Shared fixtures and test configuration
│   ├── common_test_files/      # Shared test data and helper files
│   └── unit/                   # Unit tests
│       ├── test_solution_api.py  # Backend API tests (transaction methods, state)
│       └── test_solution_ui.py   # Frontend tests (callbacks, layout)
│
├── AUTHORS                     # List of authors
├── CHANGELOG.md                # Release history and changelog
├── CODE_OF_CONDUCT.md          # Community code of conduct
├── CODEOWNERS                  # GitHub code ownership rules for PR reviews
├── CONTRIBUTING.md             # Contribution guidelines
├── CONTRIBUTORS.md             # List of contributors
├── LICENSE.rst                 # License file
├── pyproject.toml              # Poetry project configuration (dependencies, build, tools)
├── README.md                   # Project overview and quick start
└── tox.ini                     # Tox environments for testing, linting, and doc builds
List available solutions#
List all solutions using SAF CLI.
saf solutions
The output shows all solutions, grouped by name, their root directory, and display name.
❯ saf solutions
my_solution
    Root directory: C:\Users\my_user\my_solution
    Display Name: My Solution

my second solution
    Root directory: C:\Users\my_user\my second solution
    Display Name: My Second Solution
List all solutions using Solutions Manager.
Open Visual Studio Code.
In the Activity Bar, click the Solutions Manager icon.
In the Solutions Manager pane, expand the Available Solutions view.
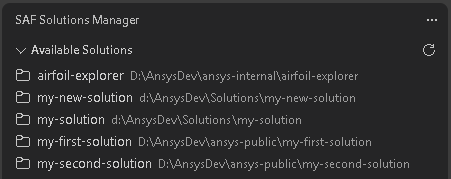
The view lists all solutions, grouped by name and root directory. Hover text shows the solution’s root directory and display name.
Tip
To refresh the list after a solution has been removed, click the Refresh icon in the top right corner of the view.
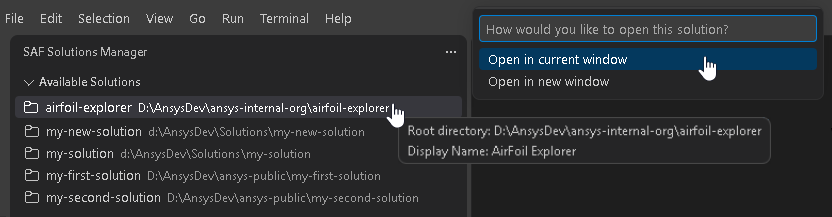
To open a solution from the list:
Click it in the Available Solutions view.
In the dialog that opens, click an option to indicate whether you want to open the solution in the current window or a new window inside VS Code.
Remove a solution#
To remove a solution, delete the solution directory or move to a different location.
SAF CLI internally validates the root directories associated with each solution. Therefore, if the solution cannot be found at the registered path, the solution does not appear in the list of available solutions and raises an error when you try to execute a command with it.